8 minutes
GPG
GPG
performed by: jb-williams
GPG(GnuPrivacyGuard) is an Open Source implementation of PGP(PrettyGoodPrivacy). It allows you to encrypt/decrypt and sign data communications.
A quick walkthrough of GPG.
Works on most all OS’s, this will be a Linux, and quick Windows walkthrough.
Public/Private Keys:
- You make a Public Key and a Private Key(always keep Private Key safe and do not share with anyone).
- You give you Public Key out to anyone.
- They use your Public Key to encrypt the message they want to send to you and you decrypt it with your Private Key.
- You use their Public Key to encrypt a message you want to send to them and they decrypt it with their Private Key Calculating Key Counts based off of # of People Employees.
- Symmetric Key count:
- (N*(N-1))/2 = count of symmetric keys - N = num of individuals
- Asymmetric Key Count:
- N*2 \
Linux
Step 1 Create a Key Pair
The first step in using asymmetric encryption is to generate a key pair. We will be using Charles and Jack as example people.
- To create a Public/Private Key, Charles will enter the following command:
gpg --full-gen-key
-
Next, Charles will be asked to enter the following info:
-
Real Name: What the user will name their key. We will use Charles.
-
Email Address: Email associated with the key. We will use charles@email.com.
-
Change (N)ame, (E)mail, or (O)kay/(Q)uit?:EnterOto confirm your information. -
Passphrase: A password for the encryption key. Anytime Private Key is used, passphrase will be verified:
- Select any passphrase, just make sure to remember it for later use.
-
-
Example Output:
gpg: key D81710193A5FC56A marked as ultimately trusted
gpg: directory '/home/charles/.gnupg/openpgp-revocs.d' created
gpg: revocation certificate stored as '/home/charles/.gnupg/openpgp-revocs.d/C4A3CFC-
51a
B1318FFD4D2C291D81710193A5FC56A.rev'
public and secret key created and signed
- To verify the keys were created you can use this command:(returns all keys in Charles’ keyring.
gpg --list-keys
- Example Output:
/home/charles/.gnupg/pubring.kbx
-----------------------------------
pub   rsa3072 2019-12-11 [SC] [expires: 2021-12-10]
C4A3CFC51B1318FFD4D2C291D81710193A5FC56A
uid           [ultimate] charles <charles@email.com>
sub   rsa3072 2019-12-11 [E] [expires: 2021-12-10]
Step 2: Exporting and Importing Keys
The person sending a message needs the receiver’s Public Key to encrypt the message for them. Charles will need to export his Public Key to make it Public, so others like Jack can use it.
-
Exporting puts the Public Key in a format that can be shared and used to encrypt.
-
Charles would use the following command to export his Public Key:
gpg --armor --output charles.gpg --export charles@email.com
-
gpg: The command to run GPG. -
--armor: Puts the key in an ASCII format. -
--output charles.gpg: Creates the Public Key in an accessible format. In this case, we named the keycharles.gpg. -
--export charles@email.com: References which key to use from the key ring. It is referenced by the email. -
To view the exported key, in the folder you exported it:
cat charles.gpg
Example Output(shortened):
-----BEGIN PGP PUBLIC KEY BLOCK-----

oCN2AghQUDgu5yBVAmPAx7hatvcMBR1X6NqJN4wStLB21OvHdgT2VbiHUtwkGvbJ
Hsui9eTR7bBY1YgP8PcGFjeMZ5+C7E94uYeksbwMzFWGE79M3kqEi1tgkDZTN/T8
8O31qQUgDCCbUnuvpW5pYJ2BconeNBHAZNKSKg+9U3DfCazRpky89be6W7WtjDGs
iFo5PEjBTvCJJXHvDgn2W7I7U0MWO220gyCT/Ja/eKad5GKTeMjOC4ERTwvha0ON
-----END PGP PUBLIC KEY BLOCK-----
- Now, Charles can either put this Public Key on his website, and/or share it directly with someone. ie:
Jack
Here are the steps that Jack needs to take.
- After Jack saves the key he will need to import it into the keyring.
gpg --import charles.gpg
- Confirm it was imported by listing the keys.
gpg --list-keys
- This should show Jack’s addition of Charles’ key (Jack has not created any keys yet).
pub   rsa3072 2019-12-03 [SC] [expires: 2021-12-02]
39B2BD6C93E1E63E8C004183FE91AF7A7B4EC267
uid   [ultimate] Charles <charles@email.com>
sub   rsa3072 2019-12-03 [E] [expires: 2021-12-02]
Step 3: Encryption
Jake now has Charles’ Public Key in his key ring, so he is ready to create a message and encrypt it.
- Jake will want to create a file that will contain a message, so we’ll use the following echo command to create a file called
Jacks_plainmessage.txt.
echo "Hi Charles, my bank account number is 2783492" > Jacks_plainmessage.txt
-
The next step is to use Charles’ Public Key to encrypt
Jacks_plainmessage.txt. -
We will use the following command:
gpg --armor --output Jacks_encryptedmessage.txt.enc --encrypt --recipient charles@email.com Jacks_plainmessage.txt
-
gpg: The command to run GPG. -
--armor: Puts the encrypted message in an ASCII format. -
--output Jacks_encryptedmessage.txt.enc: Command for the output file, which creates the name of the encrypted file. -
--encrypt: Tells GPG to encrypt. -
--recipient charles@email.com: Tells GPG which Public Key to use, based on the email address of the key. -
Jacks_plainmessage.txt: Specifies for GPG which plaintext file to encrypt. -
Run the command to created a file that has ciphertext called
Jacks_encryptedmessage.txt. -
Run a preview command to illustrate the file has now been encrypted:
cat Jacks_encryptedmessage.txt
- The encrypted message should look like the following:
-----BEGIN PGP MESSAGE-----

hQGMA1p4Le4c2oCaAQv+MT2ghzg9RYymSIxnbwe41LpOPx76mA9f6mQYZO77c/Ij
u14kEgfaVM9PxxBw8KpEkg5NvmBVPAfxFbFrcLoKB8lVW8MTpp3mQ8r0257PNORK
bQOC+HHktQN3AJrsgN/Oj4OduM+hMtnPUdWa0X7uOOKRFW9r5CbuYga134EzoHG3

-----END PGP MESSAGE-----
Step 4: Decryption
The last step is for Jack to send his encrypted message over to Charles, so she can decrypt it with her Private Key.
-
Once Charles receives Jack’s encrypted message, she will save it in a directory and then run decryption commands against the file.
-
The command that Charles will use to decrypt Jack’s encrypted message is:
gpg --output Jacks_decrypted_message --decrypt Jacks_encryptedmessage.txt.enc
-
gpg: The command to run gpg. -
--output Jacks_decrypted_message: This creates an output file, which is the decrypted message. -
--decrypt Jacks_encryptedmessage.txt.enc: This is indicating to decrypt and what file to decrypt. -
Run the command. It just decrypted Jack’s message and placed the results into a file called
Jacks_decrypted_message. -
Preview the decrypted file by running:
cat Jacks_decrypted_message
- This shows that now Charles can see Jack’s plaintext message:
"Hi Charles, my bank account number is 2783492."
Signing
Signing with GPG gives the ability to verify that a file came from you or a specific person.
You can verify signature before extracting the data.
Signing:
gpg --sign text.txt
Verifying:
gpg --verify text.txt.gpg
You can also have a detached signature file.
gpg --detach-sign text.txt
Then, you need to have both text.txt and text.txt.sig in the same directory and verify the signature with gpg --verify text.txt.sig.
This part was just a quick overview of the signing.
Windows
Step 1: Setup
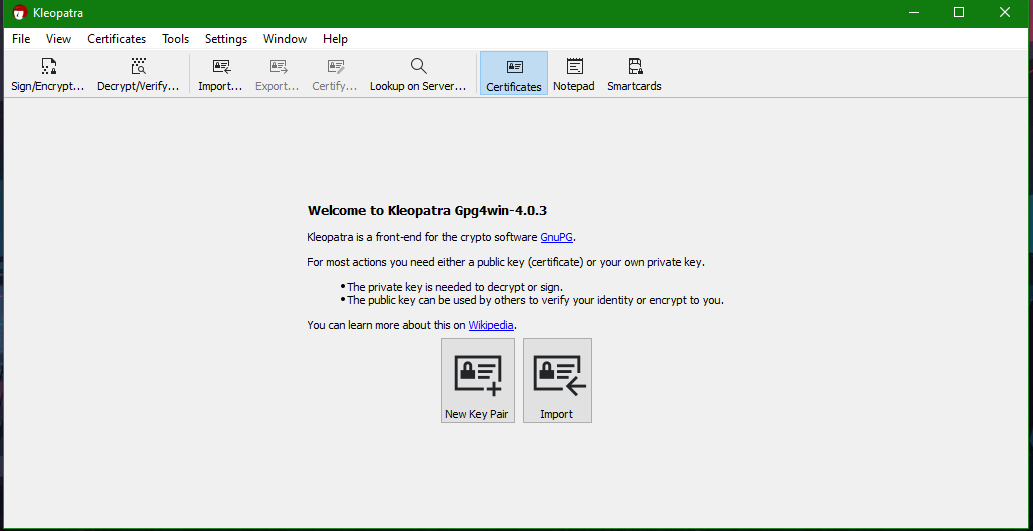
Download and Install GPG4Win, then run Kleopatra after the Install Wizard is done. You will come to this screen.
Step 2: Generating Key Pairs
- Then, in Kleopatra, Navigate to:
- File -> New Key Pair
- (this walkthrough) We will be working with the OpenPGP key pairs.
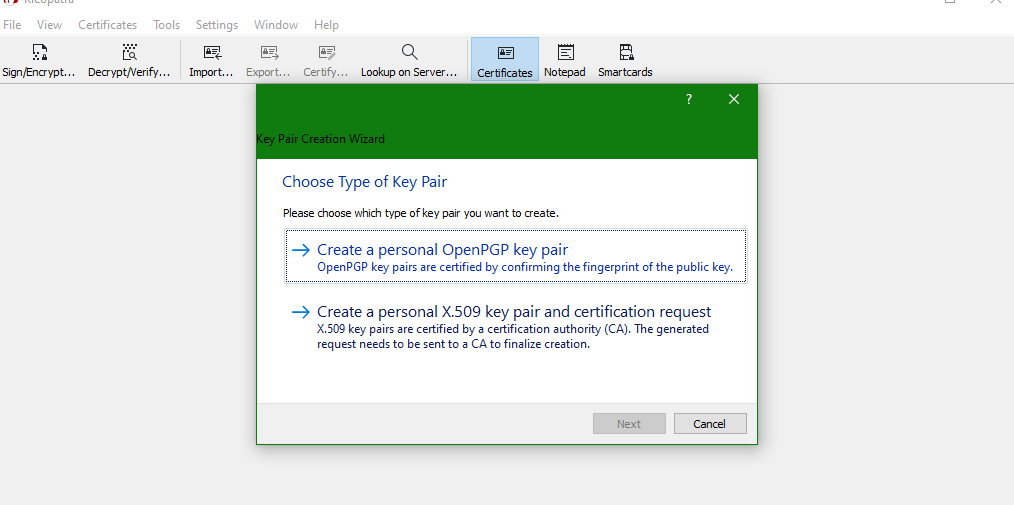
- Now it will ask you to enter your Name and Email, your Identifiers. I would also suggest protecting the generated key with a passphrase. Enter the desired information.
- Click
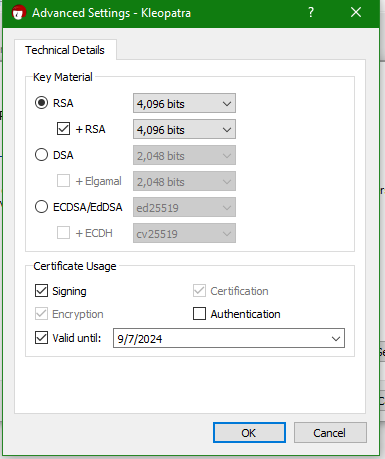
Advanced Settings, this is where you select your encryption type as well as desired usage like Signing, Authentication, and Expiration Date - We will use
RSAfor this quick tutorial. - The
2048 bitsis the default encryption strength, I suggest using the max number of bits offered. For me4096 bits. ClickOk. - When everything is set right click
Create.
- Then enter your desired passphrase for your new key pair.
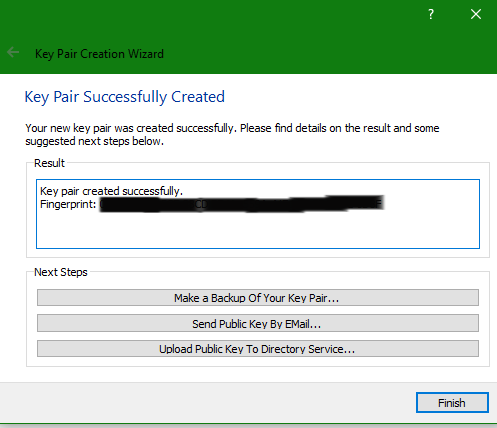
- Then it will generate the key pair, and depending on your computer the completion time may vary. After it Generates you should see this window.
- Then clicking
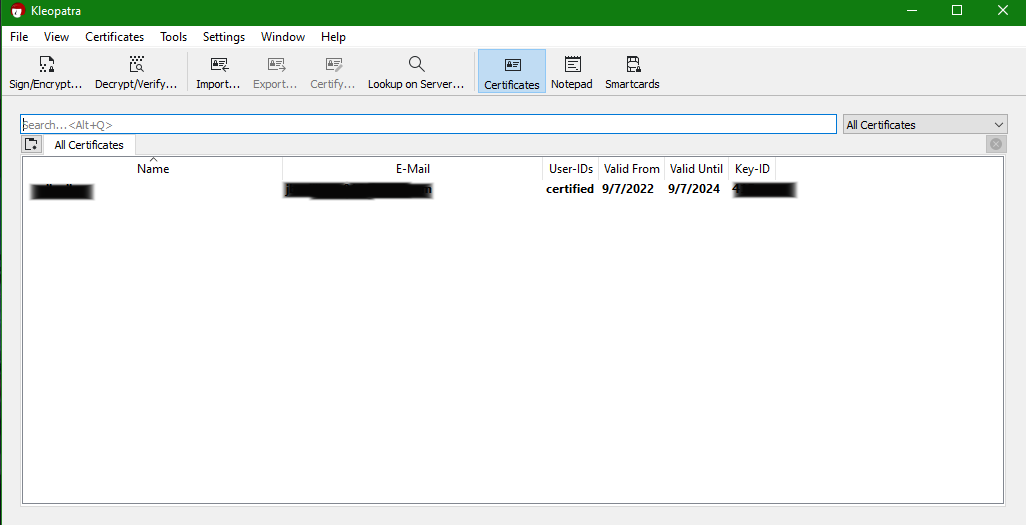
Finish, you should be able to see your key now listed in Kleopatra.
Step 3: Exporting Public Keys
Public Key
- For this to function properly, you will need to Export your Public Key so others can get it and encrypt files/messages for you.
- To do this we will
Right Clickon your key you just created and clickExport:- Then you may rename it as you wish, I tend to use my Name Identifier and public like
johnSmith_public. - The save window will already have it set to the
.gpgfile extension. - Then save it somewhere you can easily access(Desktop, Documents).
- Then you may rename it as you wish, I tend to use my Name Identifier and public like
Step 4: Importing Public Keys
- Find the Recipients Public Key, and you can copy the contents to a new text file.
- Open Kleopatra, and on the top action bar there is an
Importbutton. Click it then navigate to that text file you just created andOpenit. - NOTE You may have to set the dropdown right above the
Openbutton toAny files. - There should now be an
Imported Certificatestab next to theAll Certificatestab.

Step 5: Encrypting Data
- To Encrypt data, one way is:
- Open the text you are wanting to encrypt.
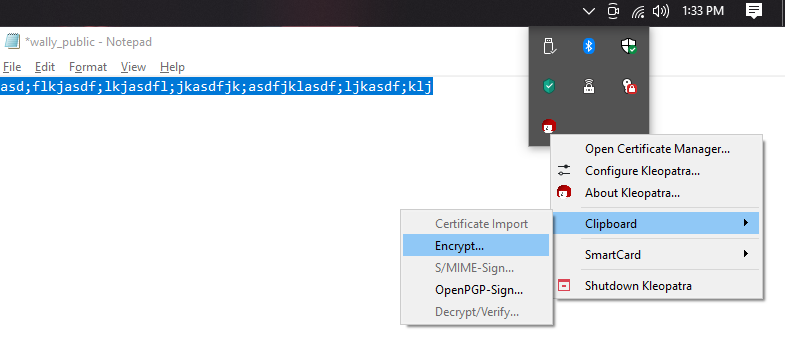
- Select it all and then Copy it to the clipboard(Ctrl+c, or right-click and select
Copy). - Then go over to your icon tray area. It is likely on the bottom of the screen, I’ve set mine to the top of the screen.
- Right Click on the Kleopatra Icon in the tray.
- Got to the
Clipboardselection then selectEncrypt:
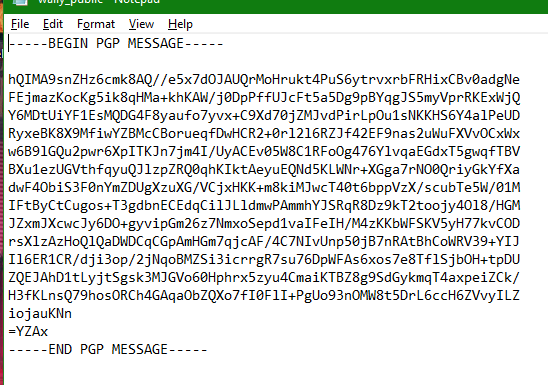
- Once it is encrypted, it gets sent back to your clipboard.
- Paste your newly encrypted text into a document, save and send to the recipient.
Step 6: Decrypting Data
- Open the encrypted file sent to you into a document:
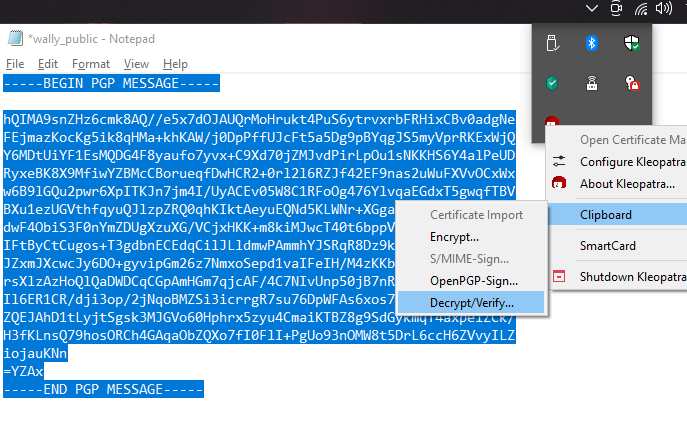
- Select all of the text and Copy it into your clipboard.
- Go back to the icon tray, right click on the Kleopatra Icon, navigate to
Clipboardand selectDecrypt/Verify.
- Decrypted text will be in your clipboard.
- Open a document and Paste the Decrypted text into that document.
My Simple Programs
Some simple encrypt/decrypt/signing programs I made.
Common GUI Apps
gpa - Linux
Kleopatra - Linux
GPG GUI for Windows
gpg4win - Windows(gpg4win comes with Kleopatra)
Good GUI Video Tutorial
HackerSploit - YouTube